Connect your application to Danløn
Before becoming a partner that appears on Danløn's integration page, you will have to implement a few landing pages and endpoints that our shared users are redirected between when trying to connect or disconnect our applications.
Connect: A user shares Danløn access with our partner (you).
Disconnect: A user removes access to Danløn for a partner (you).
Connect
Our users can either initiate connecting our applications from our integration page or from your own integration page. Our integration features available integration partners including their logo, description, screenshot and/or a video. Your application will appear on this page, once your integration to Danløn goes live.
To connect our user will have to be redirected between our applications a few times.
Your Landing Page
Your landing page is a page in your application where the user can initiate a connect from your end, or to which we can redirect a user if they initiated a connect on Danløn.
A landing page url could be: partner.com/app/DanlonConnet
Flow
The following is a flow diagram to show the browser redirects and calls being made back and forth to make a connection. We will investigate each step individually soon.
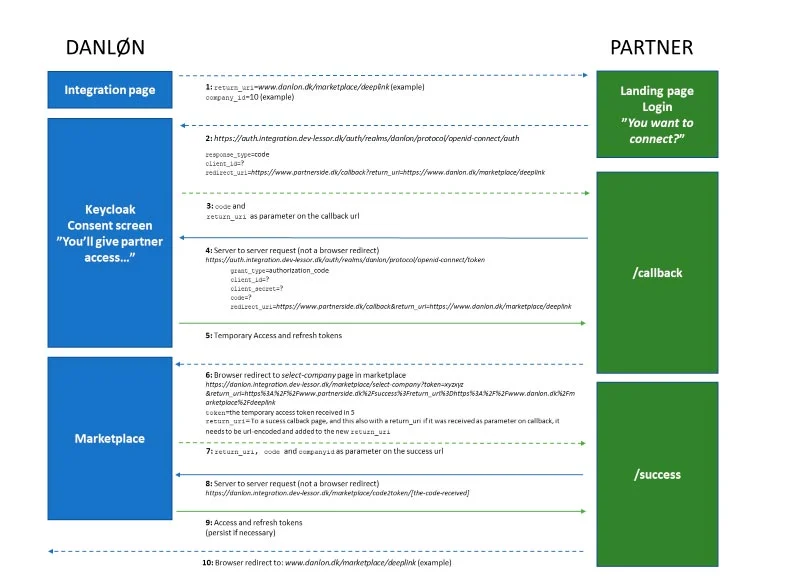
Dashed lines: Browser redirects
Step 1: Danløn initiates Connect and Redirects to your Application
If a user decides to initiate the connect on Danløns integration page, we will redirect to your landing page in your application. This includes a return_uri (e.g. danlon.dk/marketplace/deeplink) that you will have to include in the following steps and use for a browser redirect in step 10, so that the user ends up back on our integration page since they initiated it on our integration page.
If a user hits the landing page and is not logged in, the user should be prompted to log in and stay on the landing page. Remember that the return_uri should remain a parameter throughout the login process, so it follows the user to the landing page after logging in.
You can implement a consent screen to ask the user if they are sure they want to connect our app (Danløn will also have a consent screen before giving access to your application).
The landing page may also reflect how you wish to direct users to initiate a connect from your application. As you may see, this makes step 1 and 10 only necessary when a user initiates the connection from Danløn. This makes the user flow smaller when they are connecting from your application. In the example.com code, you can see a reference implementation on how we have coded a landing page that can handle a return_uri when Danløn redirects to it and how it can initiate a connection when no return_uri is given.
Step 2: Redirect to Danløn's OAuth2 Server
After consent is given in your application, the landing page should make a browser redirect to our OAuth2 server. The url can be seen on the flow diagram. It should include some parameters in the body as x-www-form-urlencoded. The body should have the values shown on the flow diagram.
- Response_type is always code
- client_id identifies your application; you have been given the client_id separately or together with this documentation
- Redirect_uri: once the user has given consent to sharing access to Danløn to your application, the OAuth2 server will redirect back to your application defined in this link. Remember, that if we redirect to your landing page with a return_uri, the redirect_uri should include the return_uri in the link as a parameter to your redirect_uri. So when the OAuth2 server directs to you again, you can make access it in the request. We advise against just initially saving the return_uri in a session on your application, e.g. https://www.partner.com/callback?return_uri=http://www.danlon.dk/marketplace/deeplink
- scope: you direct should include the following scope parameter: "openid email offline_access"
The final url will look like the following: "https://auth.lessor.dk/auth/realms/danlon-integration-demo/protocol/openid-connect/auth?client_id=partner_id&scope=openid%20email%20offline_access&response_type=code&redirect_uri=www.partner.dk/danlon/callback"
Step 1 and 2 conclude the purpose for the landing page. In the next section, we will discuss further the callback endpoint that the redirect_uri uses.
Callback endpoint
The callback endpoint is the second implementation you need to make your application compatible with Danløns connect flow. This is where you will receive a temporary access token and continue the connection flow.
Step 3: Redirect from Danløn's OAuth2 Server to your Application
In step 2, you gave Danløn's OAuth2 server a redirect_uri, to which there will be a redirect, once the user has given consent to share data with your application. The redirect_uri should be your callback endpoint. You will possibly get two parameters from the request map, e.g. partner.com/app/DanlonCallback?code=ABC123&return_url=danlon.dk/marketplace/deeplink:
- Code: should be used for step 4
- Return_uri: if your redirect_uri included, it will now be returned as parameter; this will be used for step 10
Step 4: Call Danløns OAuth2 with Code
Since the user is now at your callback endpoint via a browser redirect, you will need to call Danløns OAuth2 server synchronically as in server-to-server POST call. The purpose is to exchange the code you got from the redirection in step 3, to a temporary access token. The temporary access token is used to get the final access and refresh token (and then finally access to Danløn's api on behalf of the user).
The OAuth2 url that your application must make a POST call to is:
https://auth.lessor.dk/auth/realms/danlon-integration-demo/protocol/openid-connect/token
with a body containing the following key/values in x-www-form-urlencoded:
- Grant_type: authorization_code
- Client_id: identifies your application; the same as in step 2
- Client_secret: proves that your application has access to the client_id. You should have got this along client_id. The client_secret should never be exposed to anyone but Danløns OAuth2 server which is why this call is being done server to server, so the user is not exposed to the client_secret
- Code: the code your callback endpoint can read of the parameter map in step 3
- Redirect_uri: you will need to provide the exact same redirect_uri as in step 2. That means it should include the return_uri if one is provided. This is a security measurement and is only used to make sure that this call is being done by the same party as in step 2
Curl example
curl --location --request POST 'https://auth.lessor.dk/auth/realms/danlon-integration-demo/protocol/openid-connect/token '\
--header 'Content-Type:application/x-www-form-urlencoded'\
--data-urlencode 'grant_type=authorization_code' \
--data-urlencode 'client_id=' \
--data-urlencode 'client_secret=' \
--data-urlencode 'code=' \
--data-urlencode 'redirect_uri='
Step 5: Temporary Access Token is returned
The response from the OAuth2 call in step 5 will be the temporary access and refresh token.
The temporary access token needs to be exchanged to a final access and refresh token, though only using the access token in step 6 (hence the refresh token here can be ignored).
Step 6: Redirect to the Select-company Page in the Marketplace
If the user is is associated to an account with multiple companies in Danløn, the user must actively choose which company to connect with. Based upon the choice, the final token will be generated and associated with the correct account and company (and hence not directly with the user). The final tokens are in this step stored internally and associated with a generated code. The temporarily generated access and refresh tokens are at this point revoked.
The process mentioned above is initiated by performing a browser redirect to the select-company page in the Marketplace supplying the following information as parameters on the url:
- Token: the base64 encoded temporary access token (received in step 5)
- Return_uri: the url that the Marketplace will redirect to after the user has selected the company; the url should contain the same return_uri as received on the callback (this is optional)
If the there is only one account/company associated with the user, the user will not be prompted to select a company.
Success Endpoint
The success endpoint is the third implementation you need to make your application compatible with Danløn's connect flow. This is where you will be receiving the final access and refresh tokens, that can be used for accessing Danløn. It is also the place where you might persist the refresh token.
Step 7: return_uri, Code and Company id are returned
The return_uri , a code (the code associated with the final tokens) and the selected company id (base64-encoded) are returned to the success callback.
The current company id can always be retrieved by using the GraphQL query: {current_company{id}}
Step 8: Exchange Code to Final Access- and Refresh Tokens
Now the endpoint code2token in the Marketplace needs to be called, using a server-to-server call (GET request). The Marketplace will retrieve the final access and refresh tokens based on the associated code (as mentioned in step 6).
Step 9: Final Access- and Refresh Tokens are returned
The tokens can in the success callback now be persisted. At the previous steps, do not persist anything in your database until you reach this step and have a refresh_token in hand. A user can drop out of trying to establish the connection and start over later again, which can cause problems if you already have something persisted. So, let your application remain stateless until you got the refresh_token from our OAuth2 server.
The refresh token is what will give you access to Danløns api on behalf of the account/company associated with the user.
Step 10: Success - Redirect to the Initial return_uri
Finally, a connection is established between our two applications for the user. The user should now be let known what have happened. If step 1 took place and the user initiated the connection on Danløns integration page, then you should have carried a return_uri from step to which there should now be a redirect. Danløn's integration page will then show a message to the user that the connection has been successfully established.
If the integration was initiated from your integration page, you should redirect back to it or another page you have implemented to show a similar success message.
Disconnect
Users can remove access for your application to their Danløn. As with establishing a connection, a disconnection can be initiated from both applications.
Scenario 1: Danløn revokes Access and Redirects to your Revoke Endpoint
If a disconnect is initiated from Danløns integration page, Danløn will let the OAuth2 server know which will revoke the access that your application has on behalf of this user. When this have been done, your applications refresh token will be invalid and of no use.
Danløn will then redirect the user to your revoke endpoint, e.g.: partner.com/DanlonRevoke?return_uri=danlon.dk/marketplace/revoke/deeplink.
This will be your chance to clean up anything with regard to the connection, disable scheduled services, delete refresh tokens, menus etc.
Afterwards you should redirect the user back to the return_uri.
Scenario 2: You revoke Access
If a user initiates the disconnect on your integration page, it will be your application that revokes the access in the OAuth2 server: https://auth.lessor.dk/auth/realms/danlon-integration-demo/protocol/openid-connect/revoke
This request should be server to server and not a browser redirect. It must include the following payload:
- Client_id: The client id provided to you earlier.
- Client_secret: The client secret provided to you earlier.
- Token: the refresh token.
It should be noted that Danløns integration page displays if a connection is established based on what it can see in the OAuth2 server. So if you have deleted the tokens from your database and therefore no longer have access and it is displayed as such on your integration, Danløn would still show that access is granted if access is not properly revoked on the OAuth2 server.
Afterwards, when OAuth2 returns a successfully answer, you can delete your persisted tokens and clean up as in scenario 1.
Tips
It is generally considered easier to start doing the implementation as if everything is initiated from your integration page, and afterwards implementing what is needed if the connection/disconnection is initiated from Danløn with the redirects.
Use the example.com as a reference implementation on how your application can implement the desired landing page and callback endpoints. You can start the example.com application with your own client_id and client_secret and try connection and disconnection, following the redirects to get an idea of how to do your own implementation.
It is important to implement the whole connection and disconnection in such a way that a connection can be reestablished again after a disconnection.


